Joss & Main

Showing posts with label painting. Show all posts

Sunday, December 30, 2012

Painting and Sealing A Dining Room Table. Pt. 3 Refinishing A Dining Room Table Series


Hello all welcome to the final installment of the Refinishing a Dinning Room Table Series.

Today we'll be covering the painting and sealing process. The type is you use for a high use piece should be durable to be able to withstand a lot of action. Some great paints are Benjamin Moore's Advance(which is what I used) and Sherwin Williams ProClassic. These paints are latex based paints that perform to the standard of an oil based paint. If you really want durability use an oil based paint. Just know that the odor is strong and clean up isn't so easy.


Things you'll need:

Enamel Alkyd paint such as the ones listed above or an enamel based paint

Nylon or horse hair brushes( I recommend and use Purdy brushes)

Polycrylic(topcoat/sealer)

Tarp

Soap and water with a rag for clean up

Paint tray

Floetrol


Before you get started, pour your paint into the tray and mix your Floetrol in with the paint. This will help the paint last longer. It doesn't thin your paint out it just conditions it so that it dries slower and helps you leave less brush and roller marks. For one gallon of paint you will use 8 ounces of Floetrol or one cup. Since I only used a quart of paint I used 2 ounces. Or 4 tablespoons. When in doubt, Google :)

I'm sorry I don't have pictures of me painting. I only have pictures of the finished project. And of the things I used. So here we go!


Purdy 1", 1.5" and 2" Nylon brushes( I love them!!)


Floetrol for paint conditioning action


Minwax Water Based Polycrylic for protection. I'm paranoid so I may slap on an extra coat or two :)


The table. Isn't Melba gorgeous now??


The corner details. The lady who sold this to us was extremely nice and gave us four chair covers. They get the job done ;)


It's almost like looking up someone's skirt isn't it? Wink wink lol.


Upclose shot of the feet.


And the whole thing. This is our just didn't give a crap minimalist approach to Christmas decorating.


We only have enough covers for four chairs. So the ugly step sisters have to stay behind the table. Kind of like putting a bag over your head.


And our little nutcracker that Nana gave to us a few Christmas' back. I love this gift because it came from someone who loved and cared for us very much. And it's unfortunate that she is no longer with us. So every Christmas we place him in a visible space so that we can remember Nana around the holidays :)

If any of you have any questions about refinishing furniture, please don't hesitate to contact me directly. I'd love to hear about your projects and your thoughts on this project. 
Is anyone attempting a refurbishment on their own? Any other DIY painting projects in the future?

Don't forget to see the $40 Table Makeover, Part 1 and Part 2 of the Refinishing a Dining Room Table Series.


Friday, February 17, 2012

House Renovation Update!!

So as I've told you all that my hubby and I were going to be updating our house design and decorative wise. Well that plan has finally been underway!!! We've gotten a few small things accomplished but we are way behind schedule. The plan was to have all the decor and furniture building done by March 2. But I'm not so sure we're going to make it lol.

Right now I'm going to take you through the processes. The painting, building and decor processes that we'll be doing to update our home.


In the process of finishing the Euro Shame for the Master

Painting the curtains for our bedroom Behr Paint in Soulful Music and Brown TeePee

One of our tie backs from Urban Outfitters


Daddy and Maddalaena time


Daddy with MJ


Lace covered Canvas for the girls room.


Me in the "process" of lining the girls lamp shade


I could not bear to have pics up without my family being displayed in them. Meet my eldest, Seamus


Maddalaena is performing surgery on Daddy


Lylian is performing eye surgery


And now onto the abdominal cavity...


Ok back to DIYing. Here is half the lamp shade completed


DIY fabric tutu skirt.


From the side


The crazy amount of wood needed to complete the crazy amount of tasks.


Look it's as big as Lylian!!


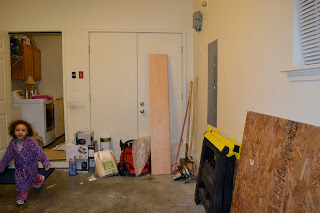
Our garage transformed into a workshop/storage facility/man cave


I couldn't resist showing you the gorgeous tie backs I received from Urban Outfitters


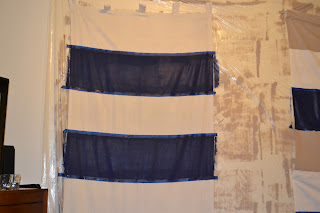
"Tarping" the wall for curtain painting


Richard hanging the taped curtains


Maddalaena taking a bite out of the step stool


Doesn't he look excited to be doing this?


Ms. Adorable


"Say something to my face!"


All this work tuckered her out


Taped curtains hung!!


All little bit of jail humor


Monkey. Kidnapped and held for ransom by one Maddalaena Jacqueline Allen


Playing with styrofoam. We didn't get enough snow so Lylian thought that she would make some.


And meet Richard, my wonderful tolerant husband


Seamus always has to be in on the action


Building Blake's dresser


Maddalaena in the back joining in on the snow making


The Ikea Lack inspired bookcase


What's a "worktable" without food?


The painting process. Living room curtain on left and bedroom curtain on right


Now the bathroom curtain


Wood project number two. The altered bookcase


I thought that wooden beams in the back would look much better than a painted wall.
Man was I right.


Make shift work bench


The tools that got this project done


Darling baby girl


Taking a much needed break.


And there you have in a nut shell. All the things we have been up to over the last two weeks. Painting curtains, building furniture and trying out some Pinterest ideas. Come back and check out the finished projects!! Also let me know what you think? Do you like the striped curtains? Is there anything lacking(besides paint on the walls)? What would you do differently? Have any of you tried any Pinterest ideas lately? I'd love to hear from you all. God Bless!