Joss & Main

Showing posts with label furniture. Show all posts

Wednesday, September 5, 2012

To-Do's to be To-Done's

A lot of people know that we're moving this upcoming November. The lovely Navy is transferring us to the USS Miami. Which if you've read in recent news caught fire due to some selfish hap on the boat who should not have been working on the boat. Anyway, there is a mondo list of furniture to do's that need to be to done. 

First up, Seamus' dresser. A few weeks ago our darling 6 year old was innocently helping me put laundry away. *CHEERS* Mom of the year right here!! (Points to self). Well, upon doing so he explained to one of his little sisters that "In order to put laundry away, ALL the drawers on his dresser(chest) need to be opened". Now, if anyone has seen my son's room you all know that he has an Ikea Malm tall dresser. With six drawers. And Ikea furniture can be very top heavy. So with all the drawers open he proceeded to pull on the top left drawer. Now in my head I'm like "What was it about these dressers again? I know for some reason this can't be good..." And as the dresser tipped over, "Oh yeah...HEY! Are you okay?". So in a couple of weeks the hubs and I are tackling the Blake Dresser from The Design Confidential. We really like the design of this piece. We were originally going to make the Small Dresser with open storage from Ana White, but we liked the shelving opportunity more.


Next project is one I'm designing on my own. Shocking!!! I never would have thought that I, me, Portia Allen Could dream up something this cool. It is an upholstered headboard. Now, I know this is reinventing the wheel. But the hubs and I are using pallets for the structure of this endeavor. We are screwing these huge pallets together side by side. Then we'll be stapling batting to the pallets. And either a white burlap material or a linen material will be stapled on top of the batting. The headboard will be framed with stained pine boards. 1x6 on the sides and a 1x8 on top and then a 1x10 on top of the 1x8.  So something like this...


The difference would be that the headboard would be deeper and it would have continuous fabric. The frame of the bed would be from The Design Confidential as well and it would be the Hudson Bed Frame*. But it would be solid wood and no upholstery.

*pictured above


Now, I'm going to briefly run through the rest of this massive to do list. And I ask that you all pray for sanity as we try to get most of this accomplished before we move. 
There are going to be two categories. One will be furniture to be stained, the other will be furniture to be painted.

First up the stained furniture!!! Now, the goal is to get all of these pieces cut, stained and holes drilled BEFORE we move. When we get there we'll just assemble everything.


2 of these


1 of  these
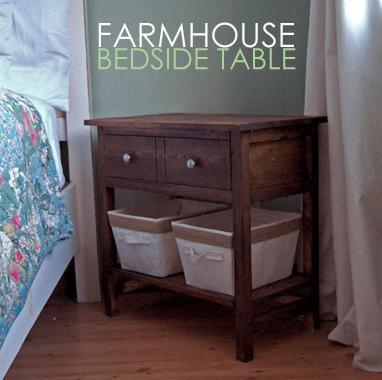

2 of these


1 or 2 of these


Remember, these are going to be built BEFORE we leave and painted after we move in to the new house.


This desk will be painted Paramount White by Valspar and the legs will be 3x3's and the top will be either plywood or MDF with crown moulding around the edges


This bookcase is from Ballard Designs. Now you may remember this little beauty that we built. We'll be using that same concept except that everything will be 1x12's and 1x6's or plywood vs. the 2x12's and 2x6's we used. There will also be crown moulding along the top and bottom but not the sides. Well, maybe.


Benchwright Media Tower*


Benchwright TV Console*

I am so excited to get all of these projects underway!! I just hope that we don't burn ourselves out doing all of this and moving shortly after :( Have any of you waited until the last minute to do something that costs a lot of time and effort? Anyone planning and woodworking plans? Or just any home decor updates? I'd love to hear from you!!


*The Ballard Designs bookcase, PotteryBarn Benchwright Media Console and Storage Towers, Ana White's Benchmark Collection, Bedside Table, End Table and Husdon 8-drawer chest are trademarks of PotteryBarn, Ana White and Ballard Designs. These are not my pictures nor am I affiliated with them in anyway. 


Friday, July 20, 2012

Beds, Beds and more BEDS!! Part 1

When it comes to cheapness we're right there. I mean we're down in the dirt with the worms. We go to thrift stores, Good Will, Salvation Army and yardselling. We even drive around Navy housing looking to see what people are giving away for free(provided it's a good quality). Now most people I would assume, are looking for clothing or little trinkets to dress their home with. And a lot look for refurbishable furniture. I am one of those people that has absolutely no luck finding great finds. I'm not sure if I go at the wrong time, or if I'm too busy trying to corral my four little ones that I just miss that diamond in the rough. So as a best case scenario, I've decided to enlist the brawn of my husband and make our own quality homemade furniture. Many of you know this from my Facebook posts or reading this blog.

Ok I know I'm starting to lose you. So... here's our next almost finished project(s). We currently for the last week or two and including the upcoming week building all new beds in our home. Back in January when we had a queen bed, our frame broke!! One of those metal frames that can fold up broke!! While we were chillin' in bed. The hubs and I were fighting(totally play of course) over what to watch, golf or HGTV. And I guess while we were wrestling, the leg said "I quit" and just gave out on us. And wouldn't you know, the same thing happened to ALL of our kids beds too. Seamus' slats failed to keep him supported. Lylian had a cheapo toddler bed that kicked the bucket within 10 months of it being purchased. And Maddalaena had Lylian's old crib that we converted to a toddler bed and that just up and jumped off a cliff. Then we got a few replacement beds for free. Now those aren't working out. Ergo we're making kick butt new beds. They're low to the ground so no toys can hide out, and IF our children decide to fall off, they won't have far to fall. So here's the progress so far...


Richard wanted a "man" shot of him lifting something big lol.


Hey measure twice and cute once right?
I kept screwing up him by talking to him lol. And he wanted to make sure that I got an action shot.


Well here's that crappy  slightly dark but wonderful action shot he was talking about. The blade is actually rotating.


Here is Seamus' frame to his bed laid out. My husband is a perfectionist and squared each corner at least 5 times. No joke.


Here he again...squaring


The corner. Nice isn't it?


And here is my youngest little girl. In her brand new romper spoken dress. She loves this thing. Cool thing about it is that I got it for free. All I had to do was pay shipping. 


The side and middle supports are in!!!


Up close, slightly and uncomfortably personal.


Another action shot. My hubs is so wonderful that he actually posed for a lot of these photos. Well, he posed because the saw was really loud without ear plugs. Yes I know this is a drill lol.


And there are the legs in all their shapely and naked glory.


And now the slats are being hammered in place.


And here she is in all her bare boned glory. Rich built this full sized platform bed in two and a half hours!!!! Crazy I know!! He is Ah-MAZING!!!


Side shot. Makes me think of BBQ ribs. Hot.Off.The.Grill. Ooohhh Yeeaahh.

The first coat of paint is on. Tomorrow I will be finishing up the paint job for this bed and helping the hubs disassemble the other bed. These plans are from Ana White's Hailey Platform Bed Project Plan.  I love me some Ana White woodworking plans. They are awesome and super easy to follow. And I love how she makes plans for projects that can be done at an inexpensive price.

Are any of you getting ideas to start building your own furniture? Or if you're not ready to build are any of you thinking about refinishing furniture? Let me know if you have any ideas or if there's anything you'd like to see me do!


Tuesday, June 5, 2012

Summer Living

We have taken quite a hiatus haven't we? So far spring in CT has been challenging. In March we have mid summer temperatures. Now that it is June we're having temps in the 50's!! CRAZINESS!! Wouldn't you agree? My son, Seamus, has his end of the year beach field trip cancelled/postponed until three days before the end of school. Talk about cramming everything in!

Hmm what's been going on with us? Not really anything. We've been contemplating purchasing a home here in CT in the upcoming fall season. We are ready to be homeowners. We're a little nervous though. 

As for summer time fun? We've pulled out our kiddie pool once. That's it. One time so far. The kids had a blast though. The love to be silly and to play in water.


Seamus and Lylian. They were taking turns filling up a bucket of water and the dumping it out. For what reason? I have no clue. But do they really need one? Nope they were quiet and getting along and I thoroughly enjoyed it.


Seamus striking a pose. He always poses for his pictures. Maybe he'll be a model. I'm hoping for a soccer star. He's super talented either way you slice it.


Maddalaena is charming adorable highly energetic and goofy. Always the center of attention. 


And my Lylian. She's goofy too. But she's a little bit more reserved. When she's 16 I'm going to show her this picture. Then I'm going to show her that I shared it with the entire blogging community lol. Imagine her reaction...

Our son Seamus is a budding soccer star and we're also contemplating on sending him to a few soccer camps to strengthen his skill. The girls have been making friends and are enjoying the warm weather.

We've been spending a considerable amount of time with my grandparents. After all they are the only great grandparents that our children know.  And they're the only grandparents to the hubs and myself that we really know. Gotta soak up all that elderly mentality. Learn those life lessons. And enjoy their expressions of their relationships and joy with our children.


As for our home? The DIY projects have come to a little bit of a stand still. We've been enjoying and adjusting to baby Blake. With how much he eats and now he's teething and staying awake longer, I'm finding less time to get things done. As a result I've been calling on the help of my hubby. Speaking of the hubs, he has started college again. Which means I get to handle the baths and he gets to handle the homework and essays. 


Here he is in all his educated glory. The hubs, big man on campus, The Don and the love of my life. What's funny is that he actually isn't all that big physically. He's not tall, or super built like a bodybuilder. But he is quick and knows some cool take-you-out techniques. That's what makes him the big man on campus. And just because he's dad.

I know that some of you browse through these posts for information and some how-to's. Others just take a peek at what's going on in our lives. And I appreciate that soo much! You'll never know truly how much. The hubs and I will be working on some up coming DIY furniture projects in the upcoming months before his/our departure from Connecticut to Maine. We have orders to report to the Miami. Recent submarine to catch on fire. You all might have read about it. Yep we're going there. I'm not too excited. But it will be a new experience. In the meantime we have a to-do list to get accomplished before we leave in Oct/Nov. Here are some pretty pictures with links so you can look at the items yourselves!

Our Bedroom:

Inspiration: 


Do-It-Ourselves:


Hudson Dresser by Ana White


1.


2.


Farmhouse Bed by PotteryBarn


Farmhouse Bed by Ana White


The Girl's Room

$10 Ledges by Ana White


Camp Dresser by PotteryBarn Kids


Kendall Dresser by PotteryBarn Kids

Simple Bunk Bed by Ana White

Photo Credit: margjack at Ana White


The Living Room

Benchwright Tower by PotteryBarn


I hope you've enjoyed this post!! Photo credits to PotteryBarn, PotteryBarn Kids and users at http://ana-white.com. Keep a look out for posts featuring these projects and more home updates! Thank you for taking the time to swing by and check this place out.


Saturday, February 18, 2012

Finished Projects From Our House Restoration

Today I'm going to share with you some of the completed projects that we have done. I will explain how we did some of them so if you wand to try it at home you'll know how!


This was presented in an earlier post. This is our Tryde Coffee Table. We got these plans for free from Ana White and after a few weeks of use I can say truthfully that I absolutely love it. It is very sturdy and can withstand my three children's bums and my husbands feet lol. I would highly recommend anyone who wants to start out woodworking to build this piece. Especially if you need a table. It only takes a few hours to build with minimal tools. Just finish to your taste.


These are my painted curtains in our bedroom. I like them but I'll tell you a little secret, they weren't supposed to be like this lol. I messed up while painting these so I changed the color pattern. It was supposed to be every other with the "white" and TeePee from Behr Paint. But I accidentally skipped a stripe with the TeePee so I just filled it in with the Soulful Music by Behr Paint. And they turned out like this. I really love it. The euro shams on our bed are reversible using these same two colors. So I'm able to switch them out and still have everything match in our room. Here is a brief tutorial of how I painted my curtains. Then here is the tutorial I used as a guide line.


And this is our new king sized bed!! Farmhouse bed frame from Ana White to come shortly. I'm hoping that by the end of June the frame will be completed.


These pillow covers are a Pinterest knock off. They are absolutely no sew and were made using old curtains I had. Now I would not recommend using this type of material, especially having family who uses these pillows for lounging. You can find the tutorial here.


This is another Pinterest find. Submerged flowers, I love it. It adds a touch of delicacy to any room or table. I had the hurricane vases previously. And I picked up two garlands of spring flowers from Joann's for $12. I trimmed the garland down to the length I needed, times two. Then I criss crossed the two garland strands to form an "x" and then placed the in the vase. And I added water and this is what I got!. It's super easy and with coupons super cheap.


These are the painted curtains in the living room. This was supposed to be the pattern in our master bedroom but I screwed that up lol. I used the same tactic in painting these and the bathroom ones(below) as I did for our bedroom.


And these are in our bathroom. We're trying to keep the whole nautical theme throughout the bedroom and bathroom. More decorations are to come!! But it's going to take time.


Let me know what you all think? Do you think it's too much stripe? I got a little carried away lol. Let me know of any other home decor/DIY projects that would look great with these themes!!